CM-Cabinets Library User Guide
In This Topic
    General Settings
    In This Topic

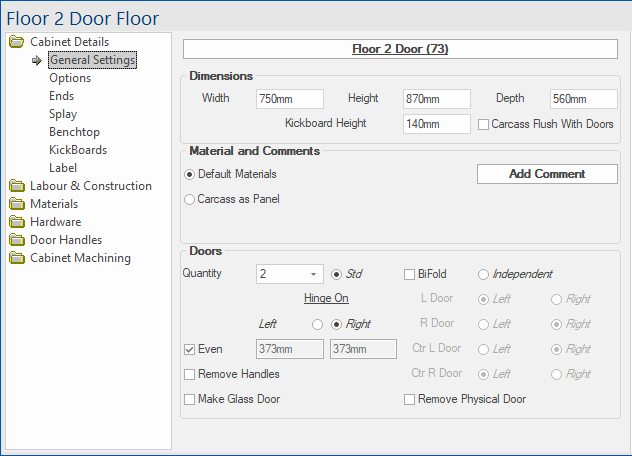
    At Cabinet level you can amend cabinet dimensions and other general attributes on the Cabinet DetailsGeneral Settings page. The height and depth defaults are set in the Job Defaults of the Catalog/Drawing Properties.  Job Notes/Comments   Cabinet Notes   Part Notes 

    The options discussed here cover the typical Floor, Wall and Tall cabinets. As the construction of individual cabinets vary, the available options will also vary and are not all covered in this topic.

    General Settings Page

    To locate information about any part of the following image, click on the area of interest.

    General SettingsGeneral SettingsGeneral SettingsGeneral Settings

    Cabinet Information button

    This button displays the name of the cabinet and the number CabMaster automatically assigned when placed in drawing, if the Show option is set on the Display > Options page.

    Clicking on this button opens the Local Properties dialog - follow link for full discussion.

    To renumber use the commands on the Insert tab of the CabMaster Ribbon.

    This is also available on the Quick Access Sidebar.


    Dimensions

    Width, Height and Depth of cabinet and kickboard can be customised.

    You are able to do math in the input fields e.g: if you type +40mm in the Width edit box which is currently displaying 750mm then the result is 790mm.

    Floor carcass Height typically includes the kickboard height i.e. If the kickboard height is 140mm and the cabinet is 730mm then the actual height from the floor to the top of the carcass is 870mm.

    Floor carcass height has the capacity to change when the benchtop thickness is altered. The Job Setup > Defaults page determines whether the carcass height includes the benchtop. 
    Cabinet Options based on Cabinet Type

    Click on Image

    Floor Door Checkbox option to make the Carcass Flush with Doors.
    Floor Drawer

    Checkbox option to make the Carcass based on Interior Height and an edit box which is made available when turned on to allow the adjustment of the interior height.

    Floor Tall Checkbox option to make the Carcass Flush with Doors and checkbox option to make the Lower Carcass based on Interior Height

    Wall

    Ability to override Height Options set on the Job Setup > Defaults page 

    Off Bench specifies the height of the wall cabinets off the bench and if selected the Height Off Bench edit box is made available. These options also affect the Height dimension of carcass as this is automatically adjusted and greyed out.

    Height to Top, if adjusted, also will affect the Height dimension.


    Materials and Comments

    Materials for current cabinet can use the Default Materials or can be changed to Carcass as Panel. See Job Setup > Materials page.

    The Add Comment button opens a text box which allows you to make comments that will be displayed in reports such as Column Board Report by Cabinet.rpt


    Doors/Drawers

    The quantity of Doors or Drawers, as relevant to selected cabinet, can be adjusted.

    Cabinet Options based on Cabinet Type

    Click on Image

    Floor Door

    Door type options are ...

    • Std (Standard) - default.
      • Even checkbox is only available with "2" doors on the Floor Standard. Unchecked, the Even it allows you to adjust the size of each door. Checked, Even will set size of both doors to be the same.
    • BiFold
    • Independent - Hinges can be set for each door of the available 4 doors, if required i.e. L/R Door and Ctr L/R Door, made available only if applicable.

    See topic on Cabinet Independent Hinging for examples.

    Checking the Make Glass Door option is purely graphical for 3D viewing,  removing the doors centre panel and replaces it with a rectangular glass design. It is available for most door styles but cannot be applied to a door that has a Farmers or DoorMaster LT style. This option is mainly graphical but if machining is required see Mach.General > Cutout-Doors page.

    Floor Drawer

    Use Full Door for Drawer Fronts sets the front material as the 'drawer bank' default (set elsewhere).

    There is also an option to 'Add Doors' which will make the related Quantity, Hinge and Glass Door options available.

    Advanced drawer quantity options can be accessed by clicking the Quantity  button next to drawer quantity. This will open a separate window containing some alternative sizing and quantity options for the drawer front configurations. See topic Advanced Drawer Front Configuration for more details.

    Floor Tall

    Ability to have an Upper and Lower section, if quantity of doors is "1" then Pull option is made available.

    Door can be BiFold and the Hinges can be positioned Left or Right or door can be removed completely.

    Wall Much the same as Floor, except you have the added option to have Lift door.


    Cabinet Information Properties

    Local Properties of the currently viewed cabinet are provided and can be amended to reflect the requirements of this cabinet.

    Information Page

    All pages pertaining to the Cabinet Information category restate the Height x Width x Depth dimensions.

    If you enable the check boxes for Door and/or Carcass, then extra pages will be added to the Cabinet Information category. 

    On these extra pages, machining sizes are provided. The left side measurement is the finished size and the right side, in brackets, is the size with edging. This an ideal area to check if there is ever a part that seems to be coming out incorrectly in CabMaster or EzyNest.


    Cutlist

    Cutlist reporting defaults can be overridden by ticking the checkboxes for Door, Carcass and/or Panel.

    Local Properties

    Custom Local Properties such as LED Strip Rebate and the measurement defaults are displayed and can be overridden using Edit boxes.

    The Definition of these properties can be customised on the My Setup > Local Properties page.

    The defaults pertaining to each definition can be customised on the Job Setup > Local Properties page.

    Comment / Cabinet Notes

    The Comment button opens a text box which allows you to make Cabinet Notes that will be printed if enabled for the relevant report.

    The Cabinet Notes checkbox is available for the BoardDoors/DrwsHardware and/or Quantities reports. See example of report below.


    Material Tags Page

    This page is only made available if the Use Material Tags option is enabled in the Drawing Properties on the Display > Options page.

    As shown in the image below, this option allows tags to appear over the Doors and Drawers of the cabinets in the Elevation View.

    Example of use on an elevation 

    In this example a different Material tag has been set in the Drawing properties for each of the Types (Floor, Wall, Tall) - click on image.

    Notice that the Drawer Material Tag is set to be the same as the Floor Material Tag.

    Click to view default Tag descriptions set on the Materials-Advanced > Door page

    Click to view default Tag descriptions set on the Materials-Advanced > Door page

    This is a two step process in the Drawing Properties to make this available i.e. :-

    1. On the Display > Options page, turn ON Use Material Tags.
      • The default text size and vertical offset can be set here as well.

        Example: Display > Options

    2. Then on the Materials-Advanced > Door page enter the default Material Tag description.
      • If you need to have a different Material tag for each of the Types (Floor, Wall, Tall) then turn OFF All As Floor here.

        Example: Materials-Advanced > Door


    Doors Page

    This page provides more detailed information on the door parts i.e. the door cut list, with sizes and edging details.

    The left side measurement is the finished size and the right side, in brackets, is the size with edging.

    Edging Codes determines the type of edge labelling that will be used on the reports. See My Setup > Misc Setup page

    • TBLR = top, bottom, left, right
    • 2L2S = two long, two short

    The Comments will be printed if the Part Notes checkboxes are enabled on the applicable Board or Door Report page.

    A Quick Access view of this page can be setup using the Properties Sidebar.


    Carcass Page

    This page provides allows you to see a preview of the part sizes in the cabinet and add comments for reporting purposes.

    The left side measurement is the finished size and the right side, in brackets, is the size with edging.

    Information relating to carcass  -  Click to Expand

    Information relating to carcass  -  Click to Expand

    The Comments will be printed if the Part Notes checkboxes are enabled on the applicable Board or Door Report page.

    Example of Comments on Report

    Click on image to view Drawing Property Report options that need to be enabled to print Notes/Comments.

    1. Job Notes will be printed if there is a Comment entered on the Job Setup > Site page.
    2. Cabinet Notes will be printed if there is a Comment added on the Cabinet Information > Information page (discussed above).
    3. Part Notes will be printed if there are Comments added.
    Part Notes checkboxes on applicable Reports must be enabled to print - Click to view

    Part Notes checkboxes on applicable Reports must be enabled to print - Click to view

    A Quick Access view of this page can be setup using the Properties Sidebar.


    Machining Page

    This page provides more detailed information on the machining. Sample 1 = Vents 

    Click to view Special Tables (Vents) added to cabinet

    Click to view Special Tables (Vents) added to cabinet

    System Tables

    These are 'custom machining tables' that can be defined for the entire drawing (as opposed to the normal custom tables that are selected by part of each cabinet).

    The System Tables for the drawing are selected on the Mach.Parts > System Tables page of the Catalog/Drawing Properties.

    The Reset buttons can be used to revert back to the Drawing properties.

    Enable

    System Tables can be turned on/off at cabinet level through the cabinet information page using the enable checkbox options.

    On the example above the Dor 1 has been enabled and System Tables Sample 1 has been selected from the drop list, which has been set up to apply vents. Click on the above image to view example.

    Centred Labels

    By using the Centre check box in conjunction with the Part drop list, you can override the label position set on the Mach.Auto Label > Settings page of the Drawing Properties - follow link for complete details and examples.

    Other/Extra pages

    To provide customers with extra reporting flexibility, our support team can set up export tables to extract and manipulate specific data for reporting. For example, If the Supplier Reporting is enabled in My Setup > Report Properties then an extra Supplier page is added in the Local Properties of the cabinet. Whether these properties are greyed out or not is dependent on the background configuration.

    One use of this is to provide information for ordering from suppliers. An example is where this is used with the CM-Farmers library for ordering purposes of specific items, as shown below.

    Click to Expand

    Click to Expand

    My Extensions

    The My Extensions > Plug-Ins page can be accessed at Drawing level and/or at Cabinet level. A Plugin is an external control that integrates with the CabMasterPro™ interface with which the user can interact with.


    See Also

    Properties

    Drawing Property Options

    Cabinet Machining